ANTIRIFLESSO ROVINATO
Perché quando l’obiettivo è opacizzato o maculato l’astrofilo si sente perduto... anno 2013
Because when the lens is clouded or
speckled the amateur feels lost ...
INTRODUZIONE
Può accadere, soprattutto quando si cerca di riesumare un vecchio strumento a lenti o se ne compra uno molto “vintage”, di trovarsi a fare i conti con una generale opacizzazione del doppietto dovuta alla mal tenuta nel tempo del trattamento antiriflesso.
Questo si palesa generalmente come una lieve maculazione che opacizza i vetri e che non è possibile rimuovere con una semplice pulizia a strumento montato.
Occorre, se si ritiene che il telescopio valga l’impegno e il lavoro, procedere alla rimozione globale dell’antiriflesso. Tale scelta non deve spaventare poiché, in generale, i trattamenti antiriflesso di molti anni fa erano singolo strato e la loro rimozione è operazione semplice. Inoltre, contrariamente a quanto si possa pensare, l’antiriflesso non è una caratteristica sine qua non dell’obiettivo tanto che alcuni strumenti planetari di diametro anche importante vengono studiati senza trattamenti in modo da non modificare la dominante dei bianchi restituiti.
E’ vero che, senza antiriflesso, si potrebbe perdere parte della luce incidente e quindi averne un quantitativo inferiore alla focalizzazione rispetto a una lente trattata, ma l’eventuale perdita è relativa e trascurabile in ambito visuale.
Altrettanto vero è che il degrado delle immagini dovuto un doppietto opacizzato è ben superiore alla lieve perdita di luminosità conseguente alla rimozione dell’antiriflesso.
It can happen , especially when trying to resurrect an old tool to slow or if they buy one of the very "vintage" , to be to deal with a general clouding of the doublet due to poorly maintained over time in the anti-reflective coating .
This generally manifests itself as a slight maculazione that opaque glasses and that can not be removed with a simple cleaning tool mounted .
It must , if it is believed that the telescope is worth the effort and work, proceed to remove the global dell'antiriflesso . This choice should not scare since, in general, the antireflection coating of many years ago were single-layer and their removal is a simple operation . Moreover, contrary to what you might think , the anti-glare feature is not a sine qua non of the lens so that some tools are also important planetary diameter studied without treatment so as not to change the dominant whites returned.
It 's true that, without glare, you could lose part of the incident light and thus have a lower amount than focusing a lens treated , but any loss is negligible in its scope and vision.
Equally true is that the degradation of the image due to an opal doublet is well above the slight loss of light resulting from the removal of coating.
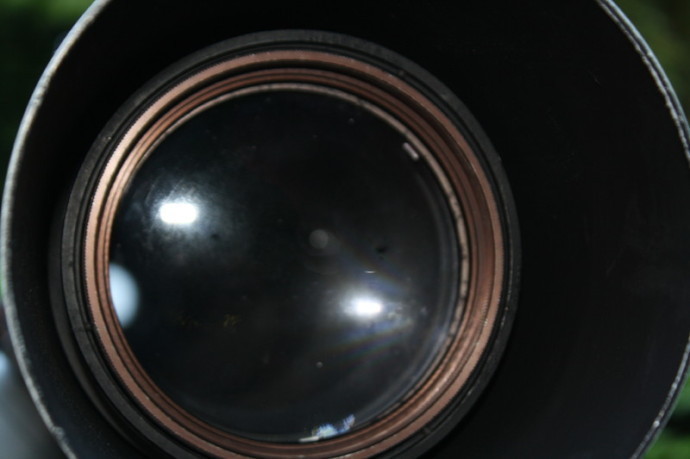
Come si presentava il doppietto prima delle operazioni di rimozione dell’antiriflesso
COSA FARE E COME FARLO
Come si procede?
La prima cosa da fare è smontare il doppietto dalla sua cella e segnare con precisione l’allineamento del flint e del crown così da poterli rimontare in modo adeguato al termine delle operazioni. E’ inoltre necessario rimuovere i distanziatori in alluminio tra le lenti e segnarne la posizione.
A questo punto è possibile avere accesso alle quattro superfici da pulire.
I metodi per rimuovere gli strati antiriflesso vintage (quindi single layer) sono di tipo chimico e fisico. Tralascio i primi perché potrebbero aggredire in qualche modo la microporosità superficiale del vetro e perché, in generale, non mi piacciono.
I secondi sono rappresentati dalla sola azione di bollitura delle lenti.
Può far sorridere l’idea di mettere a bollire l’obiettivo in una pentola da cucina ma è e resta, se eseguito correttamente, il miglior modo di trattare le lenti e ripulirle.
Dovrà essere premura contenere gli elementi ottici in cestelli di garza di alluminio o acciaio (o grossi colini fatti per alte temperature) in modo che non abbiano contatto con le superfici della pentola di bollitura e quindi non “sbattacchino a destra e sinistra” sospinte dalle bolle d’aria.
Altra premura dovrà essere posta al tempo di elevazione della temperatura che deve essere lungo e progressivo. Si comincia quindi con l’acqua a temperatura ambiente e la si scalda, già con la lente immersa, a fuoco bassissimo (il minimo) finché non giunge a “staccare le bolle dal fondo”. Quando questo accade si può lasciar procedere la bollitura per qualche minuto, poi si spegne e si attende che il raffreddamento avvenga in modo graduale. Solitamente si opera la sera e si va a dormire dopo aver spento il fuoco: la mattina tutto è finito e pulito.
Chi ha poco tempo non pensi di risparmiarne raffreddando l’acqua di bollitura con aggiunta di acqua del rubinetto “così”... il crown o flint vanno in mille pezzi...assicurato...
P.S.: benché forse superfluo ritengo corretto ricordare di NON eseguire la bollitura di elementi in vetri cristallini come la Fluorite Minerale...
How to proceed ?
The first thing to do is remove the doublet from his cell and mark with precision the alignment of flint and crown so that they can be reassembled properly at the end of the operation. It ' also need to remove the aluminum spacers between the lens and mark the location.
At this point it is possible to obtain access to the four surfaces to be cleaned .
The methods to remove the layers of anti-reflective vintage (ie single layer) are chemical and physical . I omit the first attack because they could somehow microporous surface of the glass and because, in general , I do not like .
The latter are represented by the single action of boiling the lenses.
It can bring a smile to the idea of putting to boil in a pot from the goal , but the kitchen is, and remains , if executed properly , the best way to treat the lenses and clean them .
Care must be contain optical elements in baskets of gauze of aluminum or steel ( or large strainers made for high temperatures ) so that it does not have contact with the surfaces of the pot of boiling and therefore not " sbattacchino right and left" driven by bubbles air .
Another concern should be paid at the time of temperature rise that should be long and gradual . So you start with the water at room temperature and is heated , with the lens already immersed , low fire (the minimum) until it reaches to " detach the bubbles from the bottom " . When this happens you can let it continue boiling for a few minutes, then turn off and expects that the cooling takes place in a phased manner. Usually you work in the evening and go to sleep after turning off the fire in the morning everything is finished and clean.
Who do you think you have little time risparmiarne cooling the boiling water with the addition of tap water " so" ... the crown or flint fall apart ... assured ...
PS: I correctly remember though perhaps superfluous to NOT run the boiling of elements in clear glasses as Fluorite Mineral ...

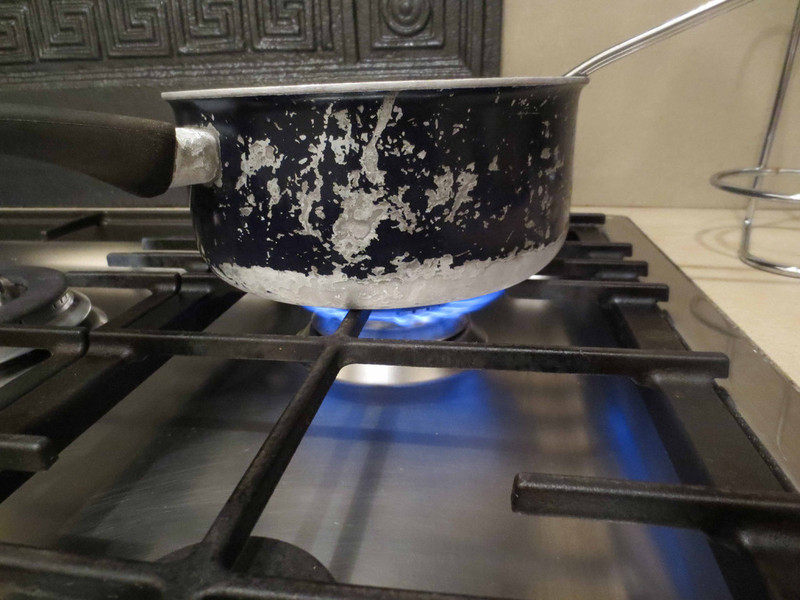
Bollitura degli elementi del doppietto acromatico 110/1100. Usare una pentola rovinata "vintage", come nel mio caso, assicura un risultato più "adeguato"...
RIMONTAGGIO
Ora possiamo asciugare gli elementi del doppietto e ammirarli. Se non ci sono graffi precedenti il nostro “vetro” apparirà pulito e trasparente come appena realizzato, pronto per essere sporcato dalle nostre dita (cortesemente usate guantini di stoffa per maneggiare le lenti).
Non resta che rimontarli, riposizionarli all’interno della loro cella originale, installarla sul tubo ottico e procedere alla ricollimazione finale dello strumento.
Affinché si colgano le opportunità fino in fondo posso dire che, se il nostro telescopio richiede una rinfrescata cosmetica al tubo ottico, focheggiatore, o altro, questo è il momento migliore per pensare di operare. Non vivremo smontando e rimontando continuamente gli elementi ottici del nostro rifrattore e quando questo avviene, e abbiamo il tubo ottico scevro di obiettivo, conviene procedere a un restauro approfondito.
Se tutto funziona a dovere avremo uno strumento “nuovo nuovo” pronto per l’uso e avremo anche vissuto una simpatica esperienza.
Now we can dry the elements of the doublet and admire them. If there are no scratches prior to our "glass" appear clean and clear as soon as made ready to be dirtied by our fingers ( please use cloth gloves to handle lenses) .
You just have to reassemble them , reposition them inside their original cell , install the optical tube and proceed to the final re-collimating the instrument.
So that we can seize the opportunities to the end I can say that if our telescope requires a refreshed cosmetics to the optical tube , focuser , or else, this is the best time to think about work . We will not live constantly disassembling and reassembling the optical elements of our refractor and when this happens , and we have the optical tube devoid of purpose , it is necessary to carry out a thorough restoration .
If all goes well we will have a tool " new new " ready for use and we even had a nice experience .


NON TUTTI HANNO CELLE COLLIMABILI: I VERI PROBLEMI COMINCIANO IN QUESTO CASO.
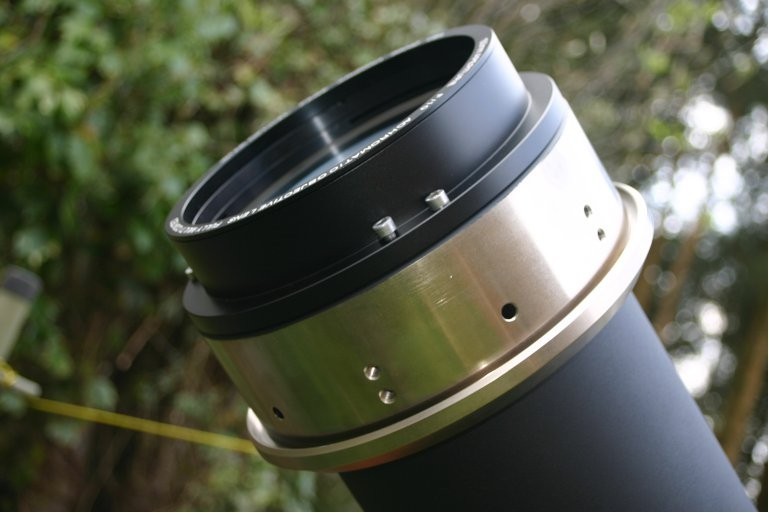
Potrebbe anche essere che il nostro rifrattore non abbia una cella collimabile (dotata quindi di controcella e viti gemelle di push-pull) come nel caso del mio 110/1100 di cui avete visto le foto sopra.
In questo caso il problema non è da sottovalutarsi perché risulterà matematicamente impossibile ricreare la corretta collimazione senza avere regolazioni micrometriche su cui intervenire.
Si hanno solamente due possibilità.
La prima, che è anche la più corretta, prevede la realizzazione di una cella adatta, o quantomeno la modifica di quella esistente in modo tale da renderla collimabile. Non è un’opera terrificante ma richiede almeno un tornio e un po’ di manualità, oppure qualche amico attrezzato o un’officina di precisione cui commissionare la modifica.
E’ la strada consigliata, comunque, anche perché aggiunge valore allo strumento e rende possibili futuri eventuali aggiustamenti.
Si può procedere però anche per tentativi spessorando con piccole piccole striscette di carta adesiva (da tagliare in misura corretta una volta testate), la sede della cella non collimabile.
Prova, riprova, smonta, centra la stella di riferimento, smonta ancora, riprova, centra nuovamente la stella, e così via... Serve una gran pazienza, metodo, e anche una notte quieta ma si può giungere a un buon risultato.
Nel caso del mio 110/1100, la cui scollimazione era molto evidente, ho dovuto procedere con rettangolini di carta di vellutino adesiva. Ho impiegato circa 2 ore a ottenere una collimazione accettabile ma il risultato finale è stato più che decoroso.
Purtroppo il doppietto soffre di un lieve astigmatismo congenito e l'immagine regge bene fino a circa 220x (oculare Takahashi LE 5mm.), poteri prossimi ai quali lo strumento ora è utilizzabile con buon profitto (prima dell'intervento ci si fermava a circa 100/120x). Sicuramente, se avessi realizzato una cella ex-novo su misura avrei ottenuto l'optimum ma già aver "salvato" il doppietto lavandolo e pulendolo e averlo messo in condizione di lavorare in modo onesto è un buon risultato. Inoltre, cosa da non sottovalutare, l'operazione (tempo impiegato a parte) non ha avuto costi.
It could also be that our refractor does not have a cell collimated (with then controcella and twin-screw push- pull) as in the case of my 110/1100 of where you saw the picture above.
In this case the problem is not to be underestimated because it will be mathematically impossible to recreate the correct collimation without having micrometric adjustments that need work .
They have only two possibilities.
The first , which is also the most correct , involves the construction of a suitable cell , or at least the modification of the existing one in such a way as to make it collimated . It is terrifying work but requires at least a lathe and a bit ' of manual , or a few friends or workshop equipped with precision which commissioned the change.
It 's the way recommended , however, because it also adds value to the instrument and makes possible any future adjustments.
You can , however, also proceed by trial and error shimming with tiny little strips of adhesive paper ( to be cut into the correct size once tested ) , the seat of the cell is not collimated .
Try , try again , disassemble , centers the reference star , disassembles again, try again , re-center the star, and so on ... It serves a great patience , method , and also a quiet night but you can achieve a good result.
In the case of my 110/1100 , which scollimazione was very clear , I had to proceed with rectangles of paper adhesive velveteen . It took me about 2 hours to get a collimation acceptable but the end result was more than decent .
Unfortunately, the pair suffers from a mild congenital astigmatism and the image holds up well up to about 220x ( Takahashi LE 5mm eyepiece . ) , Which powers the next time the instrument is used with good profit ( before surgery we stopped at about 100 / 120x ) . Surely, if I had a cell made from scratch on the optimum extent I would have gotten it already had " saved" the doublet washing and purifying it and putting it in a position to work in an honest way is a good result. Also, last but not least , the operation ( time spent apart ) did not have costs.


Immagini utili: a sinistra una cella non collimabile, al centro esempio di cella collimabile realizzata da un amatore, a destra un progetto possibile per la realizzazione di una cella porta ottica con viti di registrazione
n° di accessi al sito dal 10/4/2013